Version Française

Version Française
Cliquez sur le drapeau!

Sunday 24 January 2010

E.C.W.: Manchester's pikemen

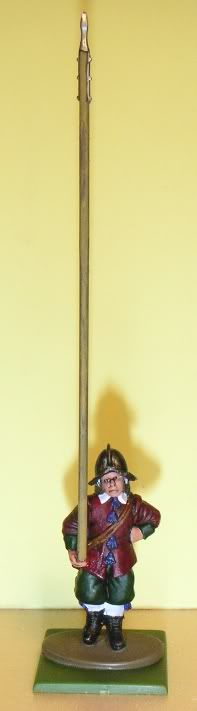
Well, it took me all of 24 days, but here are the first 13 pikemen for my company of the Earl of Manchester's regiment of foote. I'm really pleased with this box of Warlord Pike & Shotte infantry; they're fun to assemble and paint, and there's just enough variety to not need to mix them with another manufacturer's unit. I reckon I can improve the technique on them, as they still look a bt sloppy. Getting the right browns was the hardest part, and no doubt purist (or even Puritan) E.C.W. gamers will point out that the gloves are way to dark. I'll put another highlight on them at a later stage. I'm also doing a display base for the unit as a whole.

I took this opportunity to include in the photos some of those Christmas trees I purchased, to show what the finished bases look like.


If you haven't yet done so, make sure you check out Saxon Dog's blog, as the Marston Moor game he recently did was... well, take a look at these photos and you'll see what I mean.

Next up are Manchester's Major's company command group and the Green Knight.

Joe

Friday 22 January 2010

The Green Knight: Back to the Genesis


I’ve always been in awe of the classic Geen Knight model as painted by Mike Mcvey, ever since I started the hobby a decade ago. I’ve not felt confident enough to undertake painting such a great mini… until now. I’ve seen plenty of attempts people have made at reproducing the splendour of the swively-lined-trapping clad destrier, unfortunately, they all seem to end up looking like just that; attempted reproductions, unable to reach the same standard. In order to avoid falling into the same trap, I decided to go back to the origins of the Green Knight and ignore all existing versions of him.
Mike McVey's masterpiece

Simon Armitage, in his brilliant modern-English translation of the legend, gives a brilliant description. From this passage (Sir Gawain and the Green Knight (2008) Amitage, S., pp.11-15), I noted some particularly interesting features.
Simon Armitage's brilliant modern-English version of the legend

Apart from the obvious “a mountain of a man, immeasuraly high”, which means I’ll probably put him atop of some rocks, and the very greenness of both man and horse, Armitage notes how he wore a cloak “faced with all-white ermine”, his spurs are “green-gold”. The G.W. Green Knight has no cloak, nor am I inclined to add one (if it ain’t broke, don’t fix it), but I will use the heraldic representation of Ermine of the horse’s trappings, rather than the now conventional lines. The details of the armour will be in green-tinted gold. Armitage also states “the details of his dress are difficult to describe, embroidered as it was with butterflies and birds, green beads emblazened on a background of gold”. That gives me the pattern for his garments, although I might switch the colours, to paint gold details on green cloth.
Two points in which he will differ from the description are the weapon (he will keep his fine G.W. sword, rather than have an axe) and he’s wearing armour. I’ve decided to painted the armour green-tinted silver. In order to tie in the Arthurian figure with the G.W. Bretonnian, his fleur-de-lys will be reproduced on the back of his horse’s trappings.

At least, that’s the theory…

Joe

Tuesday 19 January 2010

Cold steel on the plains of the Eastfold

Hear ye! Hear ye! Here follows the account of a battle (not part of th mini-tourney series) in which my valliant Rohirrim took on the pretentious Faramir's insolant Godorian troops (fielded by Teutonico). In what is turning into a prolonged quarrel between the Steward of Gondor and King Theoden of Rohan, Faramir has been tasked with leading a raid on the Eastfold. Theoden swiftly mustered a defence force, centred around his loyal Royal Guard, to contain the threat.

Pitched battle. No special rules. The battle ends when one sid falls below 50% of its initals numbers.

Reinforced by 5 men at arms from Dol Amroth and three Archers of the Citadel (represented here by 3 elves), the army of Minas Tirith decided to adopt a formation with 2 distinct ifantry columns in 3 ranks (swordsmen, spearmen, pikemen), supported by archers on the flanks and a squadron of knights on their left.

Opposite, I set up my Rohirrim infantry in one continuous battle line, choosing to drop my usual Saxon wedge formation in favour of having the flexibility to react to my enemy's moves; this was the first time I'd been up against someone using those tactics. Behind my infantry line, I placed my cavalry. My archers took a position up on the hill on my far left.
While either side'sarchers traded arrows in the face, Gondor's two infantry blocs advanced and close together, allowing just enough room for an infantry figure to pass between them. My main line advanced to envelop the men of the White City. This tactic Teutonico was employing may seem somewhat strange, but there was a very coherent logic behind it. One of the main weaknesses of large infantry blocs ranked three deep is that the men can block each other's movement, creating unnecesary casualties (see Agincourt 1415, amongst others, where the Frenchmen in the rear ranks pushed their firends in the front rank onto the English blades). Divided his formation into two blocs allowed Teutonico a certain freedom of movement, whilst maintainng the advantage of a 3-rank block.
Gondorians and Rohirrim fell in equal numbers; my Royal Guards took some punishment, whilst Teutonico's flanks suffered. When I sent my riders around his right flank, he did something incredible; his spit his cavalry! Against what I thought to be sound advice (this was only a friendly, after all),he sent three knights to tackle my 6 riders led by a fully armoured Theoden and his three other knights against my javlinists. I was gobsmacked at such foolhardiness. Both Tonico and I moved our archers in at a steady pace, sensing that some well-placed reinforcements could well swing the deadlock.
Given the situation and the presence of cavalry amongst infantry, some heroic actions were called for. As you can see from the above dice, I lost both my heroic charges and had to suffer the cavalry charges and inconvenient fights as a consequence of this. In spite of this bad luck (no doubt payback from my previous fight against Teutonico, in which the roles had been the other way round), my men stood their ground. This did nonetheless mean that Theoden's riders were held up by 3 knights and some infantry for a turn. What insolence!
As things hadn't moved on during that turn, another turn of heroic actions was inevitable... and once again, I lost the rolls for the order of the actions. As a result, Theoden's group was blocked for yet another turn! The audacity of it all! What gaul these French have! (Get it? Gall/Gaul...groan) The archers from both sides gradually joined the fray, to the great misfortune of more than one brave soldier. The troops were still dying in equal measure in both armies. I've never been in such a closely fought battle before!
At long last, Theoden managed to hack his way through the enemy lines to charge into their rear, accompanied by his remaining two riders.This allowed me to take control of my left flank, using the newly arrived archers to block Teutonico's two knights in that area. On the other hand, his archers, supported by two other knights, dominated my right flank. Despite the losses, Gondor's two initial formations were still clearly visible.

But, Alas!, all good things must come to an end. Although the battle had been fairly balanced all the way through, Teutonico managed to put me below 50% of my initial strength, thus winning the battle with a cool margin of 4 men. Congratulations to him; he deserves it. Throughout this game, he managed to prove the effectiveness of his new formation in 2 blocks, as well as show me the exeption to the rule "never divide your cavalry if it's in small numbers". I'm grateful to him for the lesson.
A small note as to the perils of static grass battlefields; the dice actually can land on an edge, as we saw with this jaw-dropping roll which came at a crucial moment!

Joe the Barbarian, hoping this batle rep' proved entertaining.

Monday 18 January 2010

The story continues

We continue the saga of our 4-player tourney with one of the second heat battles. I’m counting on Shas’El’Hek’Tryk to write up a battle rep for his stage 1 fight against Teutonico.


Scenario 2: "Take and hold"

In this scenario, each side vies for control of the 3 static objectives on the battlefield, as well as trying to capture its opponant’s banner by carrying it off the field by any edge possible.

Teutonico Vs BarbarianJ


This match saw my humble Rohirrim taking on the steel-clad might of its former overlords of Minas Tirith, led by Faramir. The Steward’s cadet son sought to bring the former vassals to heal, whilst Theoden of Rohan intended to prove himself the last of the great kings of men of the Ouest.

I set my Rohirrim up in a continuous ligne, in the centre of my deployment area, with the riders behind my right flank. Teutonico adopted a classic Gondorian formation, with a central bloc in two raks, swordsmen, then spearmen, with his standard and heroes in the middle. Hi archers were opposite my very sparse left flank, whilst his knights were behind the cabin. The three objectifs are represented by the piles of rocks along the centre of the battlefield.

The Gondorian archers immediately advanced, both out of a lack of targets and in order to seize control of the objective on my left flank. I dispatched a small group of warriors, led by Eowyn, to hide behind the hut, where they would await the opportune moment to contest the objective. The two amry corps opposite each other in the centre went forth, the troops of the White City occupying the ruins, my left flank anchored by the cabin. Teutonico decided to divide his cavalry into two groups of three; one going behind the cabin to threaten the group hidden behind the hut, the other passing in front of the cabin to launch itself at my main battle line. Relieved by the absence of archers opposite them, my riders straight away made the most of their freedom of movement to take the objective on my right flank and threaten the flank of Faramir's soldiers, who were hiddenamongst the ruins.

The Gondorians brought the fight to my left flank, attacking the group behind the hut, reinforced by the three knights on that side. Eowyn and the handful of peasants were set for disaster. The knights of the White City who had thrown themselves towards the central battle line suffered the peril of massed javlins; thrown fom their saddles, they were quickly put to the sword. This allowed my main battle line to push back the soldiers of Minas Tirith towards the ruins, on the defensive. My riders, on the right flank, managed to outflank the enemy, one of them fighting his way through to the standard bearer, slaying him and stealing the banner of the White Tree. Some lucky dice trows contributed towards my victory in the centre of the battlefield... but that luck was nothing compared to the jinx Teutonico suffered on the left flank! Despite the charge of his three other knights and the great superiority in numbers which his men enjoyed, Eowyn held her position with her feeble escort of javlinists.Incredible given that I'd counted the loss of the flank as a foregone conclusion and necessary sacrifice in favour of the other two objectives. It is important to note, however, that although my lucky dice rolls held back Teutonico's men on the left flank, Teutonico never allowed me to be a threat to his control of the objective held there by his archers.

At the end of the battle, I held the centre and the right flank, one of my riders had made off with the enemy flag and Teutonico was reduced to less than 25% of his initial numbers. Teutonico's archers were too far away from their .

I think that Teutonico's main mistake was in dividing his cavalry forces into two groups, thus dissipating their power. I learnt threwpast experienes to avoid such a move... but in another more recent battle, he showed me he exception which makes the rule.
RESULT: 2 objectives (2 x 3pts) + Standard stolen (4pts) + Enemy brought under 25% of his initial numbers (2pts) = BarbarianJ 12 - 0 Teutonico = MAJOR VICTORY for BARBARIANJ
A good game; Teutonico suffered greatly from poor luck.

Thursday 7 January 2010

Let the tourney begin!

Welcome to the first of 6 battle reps focusing on a mini-tourney which took place in Novembre between 3 members of this blog (Shas’El’Hek’Tryk, Teutonico and myself) and a member of the French Warhammer Forum, Nero. This is the first time we’ve tried a Lord of the Rings tournement, so we took this as an opportunity to develop some house rules for a tourney system, which I will be publishing later on.

The order of the battles was decided at random, with the following results :
1. Nero Vs BarbarianJ
Shas’El’Hek’Tryk Vs Teutonico

2. Teutonico Vs BarbarianJ
Shas’El’Hek’Tryk Vs Nero
3. Shas’El’Hek’Tryk Vs BarbarianJ
Nero Vs Teutonico
Scenario 1: "Hunters and Preys"
In this scenario, each side has 3 messengers, whose identity is unknown to their opponent, which they must get across their opponent’s table edge. Points are also awarded for slaying the opponent’s messengers and reducing the enemy below 25% of their initial numerical strength.

Nero Vs BarbarianJ

With my favourite Lord of the Rings army, which, by a happy coincidence, is also my only Lord of the Rings army, I opted for a 2-section deployment. Theoden would lead his Royal Guard and a handful of javlinists in the centre, whilst the 6 riders and the rest of the javlinists took the left wing, behind the clump of foliage and the tower. 3 lone javlinists went round behind the cottage, to hold-off any potential break-trhough on that side. As you can see from the photo, Theoden formed his guards up in my typical Saxon wedge formation.

Opposite them, Nero drew up the Rivendell elves, led by Elrond’s twin sons, in 3 groups. I naturally used the cover offered by the terrain as much as possible to advance threw the storm of arrows, trying to outrun the Nancy skirt-wearing elves with my riders. Only 5 elves (of whom one was one of Elrond’s sons…God alone knows which) managed to get between my riders’ squadron and the way out. Amongst these riders, as you’d expect, was one of the messengers, but my opponent couldn’t be sure of how many messengers were in that lot.

In the centre, Theoden led a general advance, hoping to be partly shielding from the archers by the ruins. The 3 brave javlinists on my right flank went to block the exit corridor around the back of the cottage.

By way of a response, Nero shifted his archers towards my left flank, to support his spearmen behind the watch tower. He also sent a couple of elves behind the cottage on my right; possibly a feint, but who knows? The main corps of his army went forwards, led by the other of Elronds sons to engage Theoden’s troops. I suffered some minors losses to shooting, but nothing important… exept for one of my messengers, taken out by a lucky elf who was left none the wiser to his actions! I’d thought the messenger safe amongst the crowd hidden behind the ruins, but my opponent saw a chink (now now, no racist jokes, please gentlemen). At that time, I guessed that his messengers must be grouped in the centre of his army.


This was wen things started to heat up! Most of my left flank safely made it to behind the tower. A few javlins managed to take out some elves, but only two of my riders were still alive, one of which being the only messenger on horse-back. This brave pesant was gallantly resisting the onslaught of Rivendell’s elves! I noted with some glee that Nero had started to sweat ust as much as me; did he have a messenger in that area? Or was it simply that he was getting worried that one of mine would manage a break-through? It all fell to a couple of lucky throws of the dice.


The centre of the battlefield was a fine example of what Voltaire called “heroic butchery”! I thankfully had the advantage of numbers, but, given the rate at which the elves were cutting into my mud-covered pesants, I didn’t know how much longer I’d be able to hold it out in the centre. My only solace was the absence of horses in his army. What an advantage steeds are in this type of scenario; they allowed me to pretty much choose where I wanted the fighting to take place.

Behind the cottage, two javlinists arrived into contact with two elf spearmen…and promptly impaled one of them by chucking a javlin at him during the charge. The remaining elf was held in check by the two brave lads, allowing me to play mind games with Nero, sending the third around the front of the house, knowing that he could do nothing to stop him. Was this man a messenger? No… but Nero suddenly looked panicked; how was he to know it?

The chaos in the centre continued, with the Royal Guards trying to kill as many elves as possible in the hope of killing a mesenger. There was no time left for anyone to reach either table edge. Alas! It turned out at that end that I had killed none of my opponent’s messengers, whilst he killed my last, in the form of a valliant Royal Guard! Thus, at the battle’s end, I was below 25% of my initial numbers, leaving the elves in numerical advantage, despite having started off with very few men compared to mine.
On my left flank, the last two riders fought valliantly, supported fiercely by the newly arrived javlinists, but this couldn’t save them, as the last messenger died under the numerous elven spears. We should note, however, that the elven heroes really didn’t earn their keep in this game, as they delivered very few pivital kills, having to rely instead on their rank and file troopers to do all the work. For once, I was rather please with my riders’ performance; they’re ideal for this sort of scenario, even if my Rohirrim suffered their usual fate of not being able to deliver killing blows against tough (or indeed any) armour.

Time, then, for the butcher’s bill. It turned out tat the reason Nero had been sweating so much was that, in order to contain my riders, he had to make the tough decision of sending two of his messengers into the fray! He was, luckily, able to keep them in the second rank, in relative safety, but this type of problem is symptomatic of elite armies; too few men to be able to comfortably protect V.I.P.s.

The end result was thus: 3 slain Rohan messengers (3pts for Nero), no slain elf messengers (0pts for me), no messengers evacuated by either side (0pts & 0pts) and the Rohirrim reduced to fewer than 25% of their initial strength in numbers (another 2pts for Nero).

Nero 5 – 0 BarbarianJ = 5pts difference = MAJOR VICTORY for NERO

Joe the Barbarian, what an intense game!

Tuesday 5 January 2010

The Pledge 2010

As a new year, indeed a new decade, is upon us, it’s time to make the pledge. I did say the same thing in 2009 and subsequently forgot to keep count. I’ll try to make a rough estimation by using the blog’s history for 2009. As for 2010, the count starts now, though out of fairness I’ll include the Christmas arrivals: 48 E.C.W. men of the Parlimentary foote.

Acquired: 48
Painted: 1


Having now acquired a small E.C.W. infantry force, the time has come to choose which unit to do first. I decided to go for one of the regiments which fought at Marston Moor, having just read a book about that battle and being very fond of the North East of England. My choice? The regiment of Edward Montagu, 2nd Earl of Manchester.

The Earl of Manchester

In the run up to the First English Civil War, Manchester, then known as Viscount Mandeville, was the only member of the House of Lords to be named by Charles I along with the “Five Members” of the Commons to be arrested. At the outbreak of the war, in 1642, he took command of a regiment of foot in the Parliamentary army of the Earl of Essex, but his regiment was disbanded after it fled the field at Edgehill.

Mandeville inherited his father’s Earldom of Manchester in November 1642. In 1643, Manchester is appointed head of the Army of the Eastern Association, a natural nomination for one of the most senior Lords in the Parliamentary faction. During 1643, Manchester secured East Anglia and with the Fairfaxes, based in Yorkshire, contained the threat posed by the Marquis of Newcastle in the North.

June 1644 saw Manchester amongst the three victorious commanders at Marston Moor, annihilating Newcastle’s Whitecoats. This was the last time Manchester and Cromwell cooperated with each other. Cromwell launched a scathing criticism of Manchester’s generalship after the Second Battle of Newbury. Manchester was opposed to the use of independants and religious fanatics. He was ousted from the army by the “Self-Denying Ordinance”. The final straw was the suggestion of executing the King. Though a reformist, Manchester was no regicide.
A full biography can be read
here.


So here is the first pikeman, wearing Mancester's green-lined red coat and green trousers.
Many more on the way!
Joe

Friday 1 January 2010

The English Civil War: it’s not very civilised and not very English !

Felicitations of the gorging season to you all and a happy new decade!

As Santa’s always on the ball, I now have the Parliament Infantry box and a blister of Armoured Pikemen from Warlord Games’ Pike & Shotte range. Whte better to kick off the new year than a new era of wargaming; the XVIIth Century!


The « Pike & Shotte: Parliament Infantry » box


The first thing one notices is the sheer number of minies that come in this box; 40 men for a mere £16.20 (well Santa elves do still need paying). That a lot of bangs for your bucks! For those of us used to Games Workshop’s prices, Warlord Games are an excellent alternative, all the more so given that the Pike & Shotte range are an interesting solution for Warhammer Empire players on a tight budget.

The next great surprise is that the improvement in the quantity/price ratio isn’t made at the expense of quality! Granted, they don’t offer quite so much diversity as the entirely multi-part Warhammer figurines, but that is already the case with G.W.’s Lord ot the Rings range, and the Parliament Infantry box does give 5 different poses for the pikemen and 4 for the musketeers, as well as 4 command figures with lots of options. The addition of a blister of 8 metal pikemen and an intelligent use of the available hats included in the box are enough to make the men individual rather than looking like a company of pawns.

The Earl of Essex' Regiment of Foote shown on the Warlord Games website

The box allows the assembly of 40 figurines: a central bloc of 12 pikemen, completed by a full command group of a Lieutenant/Captain, an ensign, a sergeant and a musicien (with either a drum or a lute), accompanied by 2 wings of 12 musketeers each. A sculpted standard is included, as are 8 thick paper flags. In truth, there are only 4 flags, each having one new and one battle-damaged version. The only slightly disappointing thing is that to use one of the flags, it has to be cut out of the leaflet provided, which, in the case of the Parliament box, means cutting out part of Robert Devreux, the Earl of Essex’s (supreme commander of the Parliamentary forces until 1645) biography on the other side of the page.

I can only find 3 minor flaws in this set. The first is an unfortunate consequence of the way the pikemen are positionned on the sprue; as some of them have to be put on in profile, rather than facing the front, the mould line runs straight down their faces. It has to be said, though, there this is the only way they can be made without wasting loads of space. The second is that the arms don’t always fit on very well; they often leave gaps which need to be filled with milliput, but then it’s not the end of the world. Any serious painter would no doubt do this with most multi-part kits. The last minor problem is the way some of the hats are attached to the sprue; not only would it be nice to have a few more, but some, notably the Morion helmets, require extreme care when cutting off the sprue, otherwise the rim can break, even using a hobby knife.

So the final verdict: even though there are some problems for young beginners (the need to posess milliput, etc.), for any wargamer with a minimum of experence, this is an excellent kit, great value for money and I would advise anyone who wants to quickly put together an E.C.W. force quickly to get a few of these boxes!

Next up, my choice of unit to paint, including the first painted pikeman (the result of insomnia linked to a very early morning flight)!